一、基础环境
| IP地址 | 作用 |
|---|
| 192.168.2.101 | K8S |
| 192.168.2.104 | Harbor |
| 192.168.2.105 | Postgresql |
| 192.168.2.104 | NFS |
二、环境准备
2.1、配置数据库
在192.168.2.105上执行
1
2
3
4
5
6
| #进入数据库
docker exec -it postgres_primary psql -U zabbix -d zabbix
#创建用户及数据库
CREATE USER awx WITH ENCRYPTED PASSWORD 'Awx_Pwd_2026';
CREATE DATABASE awx OWNER awx;
GRANT ALL PRIVILEGES ON DATABASE awx TO awx;
|
2.2、准备NFS
在192.168.2.104执行如下命令
1
2
3
4
5
| sudo mkdir -p /data/nfs/awx_projects
# AWX 容器内部默认使用 UID 1000 运行
sudo chown -R 1000:0 /data/nfs/awx_projects
echo "/data/nfs/awx_projects *(rw,sync,no_subtree_check,no_root_squash)" | sudo tee -a /etc/exports
sudo exportfs -ra
|
2.3、创建namespace
在headlamp中,在namespace中创建awx
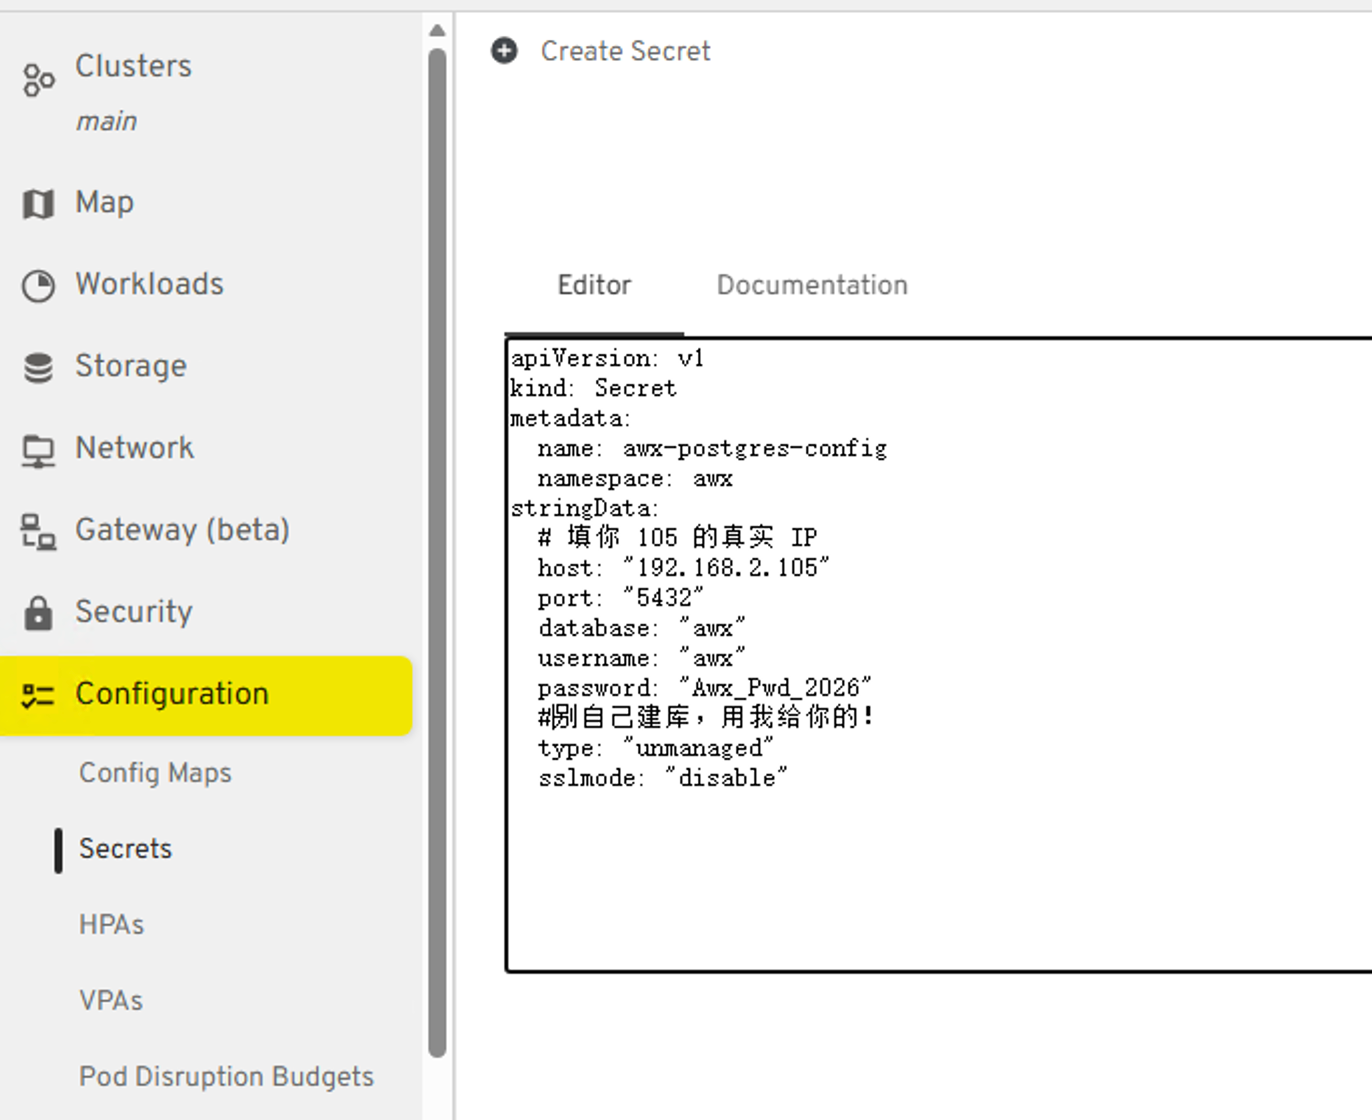
2.4、创建secret
在headlamp中找到secret,点击添加
 1
 2
 3
 4
 5
 6
 7
 8
 9
10
11
12
13
14
15
| apiVersion: v1
kind: Secret
metadata:
name: awx-postgres-config
namespace: awx
stringData:
# 填你 105 的真实 IP
host: "192.168.2.105"
port: "5432"
database: "awx"
username: "awx"
password: "Awx_Pwd_2026"
# 告诉 AWX:别自己建库,用我给你的!
type: "unmanaged"
sslmode: "disable"
|
2.5、创建PV
在PV中使用如下代码,创建一个PV
 1
 2
 3
 4
 5
 6
 7
 8
 9
10
11
12
13
| apiVersion: v1
kind: PersistentVolume
metadata:
name: awx-projects-pv
spec:
capacity:
storage: 10Gi
accessModes:
- ReadWriteMany
persistentVolumeReclaimPolicy: Retain
nfs:
server: 192.168.2.104
path: /data/nfs/awx_projects
|

2.6、创建PVC
在PVC中输入如下代码,创建PVC
 1
 2
 3
 4
 5
 6
 7
 8
 9
10
11
12
| apiVersion: v1
kind: PersistentVolumeClaim
metadata:
name: awx-projects-pvc
namespace: awx
spec:
accessModes:
- ReadWriteMany
resources:
requests:
storage: 10Gi
volumeName: awx-projects-pv
|
创建后,查看pvc和pv的状态

2.7、准备镜像
在192.168.2.104上执行
 1
 2
 3
 4
 5
 6
 7
 8
 9
10
11
12
13
14
15
16
17
18
19
20
21
22
23
|
# ================= 1. 拉取官方精确版本镜像 =================
echo "开始拉取 AWX 核心镜像 (精确版本)..."
docker pull quay.io/ansible/awx-operator:2.19.1
docker pull quay.io/ansible/awx:24.6.1
docker pull quay.io/ansible/awx-ee:24.6.1
docker pull redis:7.2.4
docker pull m.daocloud.io/gcr.io/kubebuilder/kube-rbac-proxy:v0.15.0
# ================= 2. 重新打标签=================
echo "开始打标签..."
docker tag quay.io/ansible/awx-operator:2.19.1 192.168.2.104/library/awx-operator:2.19.1
docker tag quay.io/ansible/awx:24.6.1 192.168.2.104/library/awx:24.6.1
docker tag quay.io/ansible/awx-ee:24.6.1 192.168.2.104/library/awx-ee:24.6.1
docker tag redis:7.2.4 192.168.2.104/library/redis:7.2.4
docker tag m.daocloud.io/gcr.io/kubebuilder/kube-rbac-proxy:v0.15.0 192.168.2.104/library/kube-rbac-proxy:v0.15.0
# ================= 3. 推送到 Harbor =================
echo "开始推送到 104 Harbor..."
docker push 192.168.2.104/library/awx-operator:2.19.1
docker push 192.168.2.104/library/awx:24.6.1
docker push 192.168.2.104/library/awx-ee:24.6.1
docker push 192.168.2.104/library/redis:7.2.4
docker push 192.168.2.104/library/kube-rbac-proxy:v0.15.0
echo "全部推送完成!"
|
2.8、创建awx的应用
在192.168.2.101上操作
 1
 2
 3
 4
 5
 6
 7
 8
 9
10
11
12
13
14
15
16
17
18
19
20
21
22
23
24
| mkdir -p ~/awx-operator
cd ~/awx-operator
wget https://github.com/ansible/awx-operator/archive/refs/tags/2.19.1.tar.gz
tar -zxvf 2.19.1.tar.gz
cat <<EOF > kustomization.yaml
apiVersion: kustomize.config.k8s.io/v1beta1
kind: Kustomization
# 直接读取本地解压出来的 config/default 目录
resources:
- ./awx-operator-2.19.1/config/default
# 部署在 awx 命名空间下
namespace: awx
# 原本的外网镜像无缝替换为104仓库
images:
- name: quay.io/ansible/awx-operator
newName: 192.168.2.104/library/awx-operator
newTag: 2.19.1
- name: gcr.io/kubebuilder/kube-rbac-proxy
newName: 192.168.2.104/library/kube-rbac-proxy newTag: v0.15.0
EOF
kubectl apply -k .
|
然后检查各个pod的状态
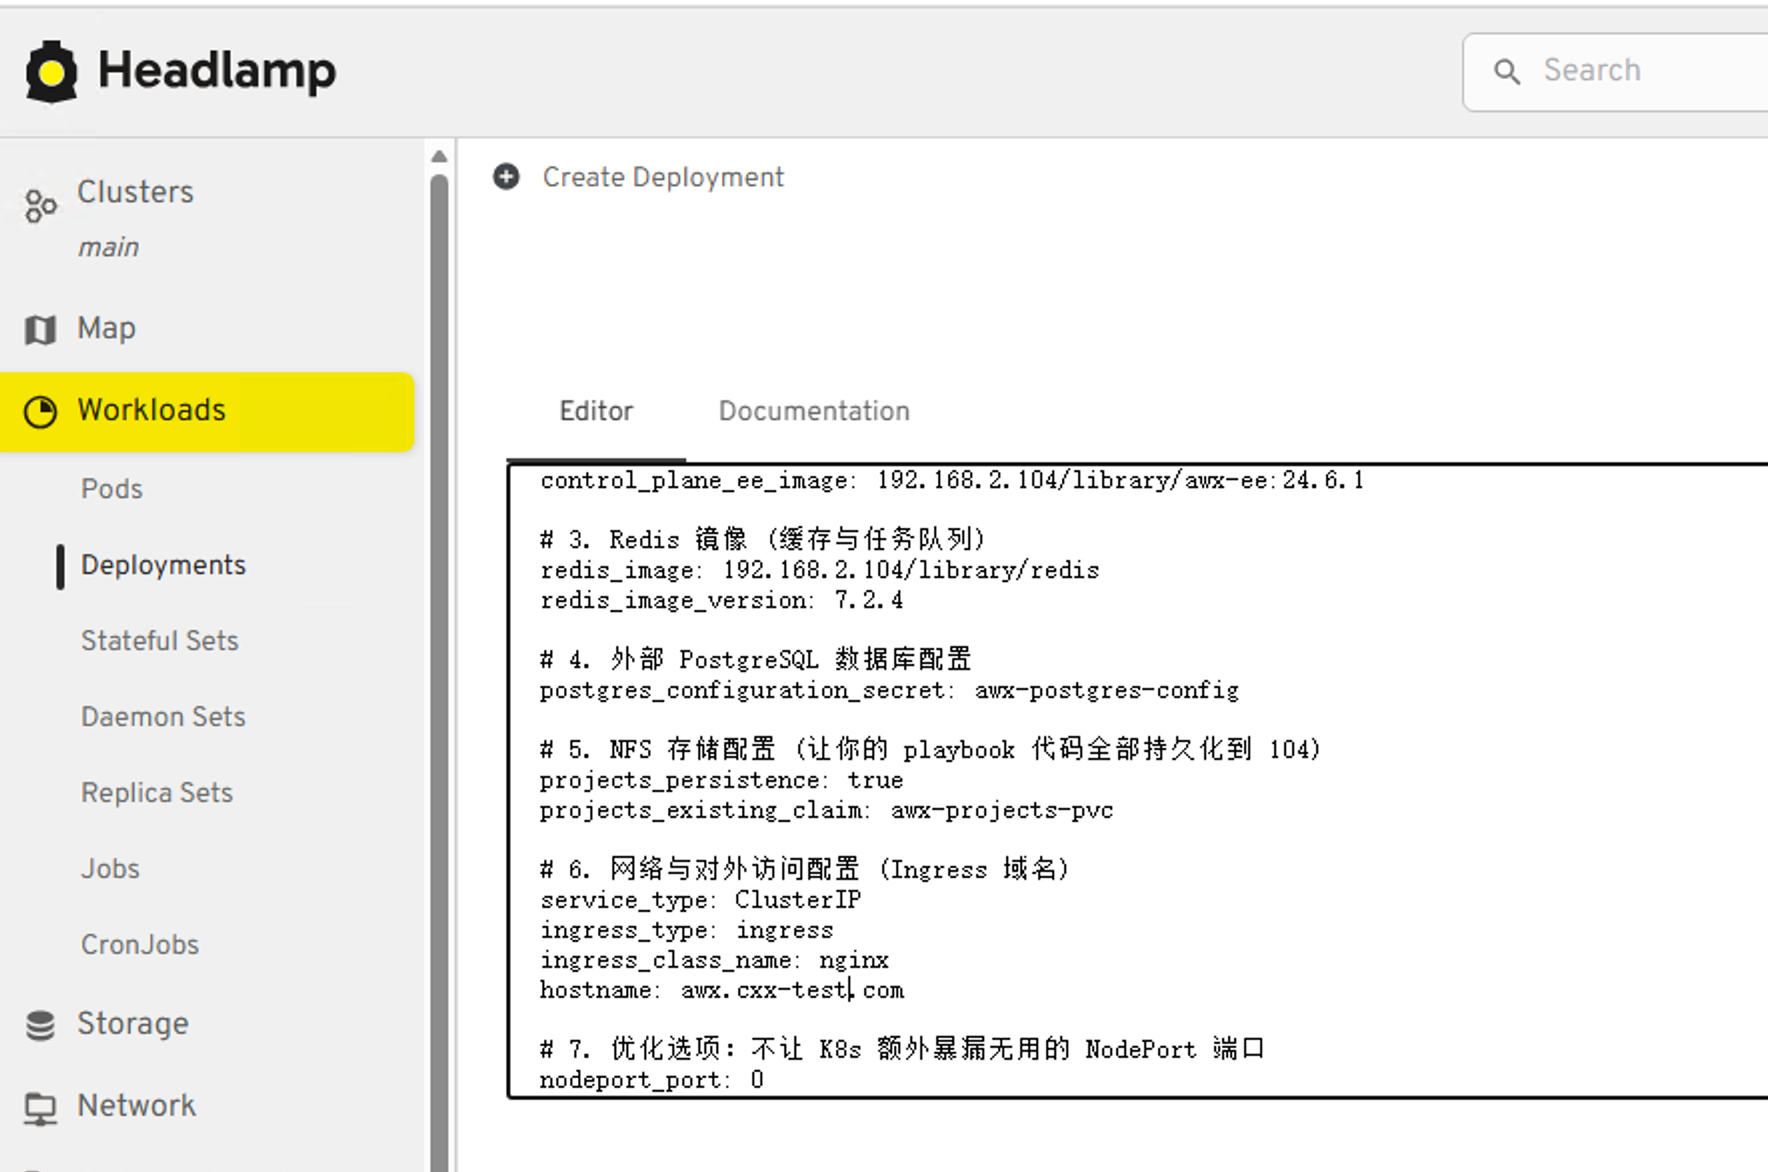
在headlamp界面上,在任意界面,点击create
 1
 2
 3
 4
 5
 6
 7
 8
 9
10
11
12
13
14
15
16
17
18
19
20
21
22
23
24
25
26
27
28
29
30
31
32
| apiVersion: awx.ansible.com/v1beta1
kind: AWX
metadata:
name: awx
namespace: awx
spec:
# 1. 主程序 Web & Task 镜像
image: 192.168.2.104/library/awx
image_version: 24.6.1
# 2. 控制平面执行环境 EE 镜像
control_plane_ee_image: 192.168.2.104/library/awx-ee:24.6.1
# 3. Redis 镜像 (缓存与任务队列)
redis_image: 192.168.2.104/library/redis
redis_image_version: 7.2.4
# 4. 外部 PostgreSQL 数据库配置
postgres_configuration_secret: awx-postgres-config
# 5. NFS 存储配置
projects_persistence: true
projects_existing_claim: awx-projects-pvc
# 6. 网络与对外访问配置 (Ingress 域名)
service_type: ClusterIP
ingress_type: ingress
ingress_class_name: nginx
hostname: awx.xxx.com
# 7. 优化选项:不让 K8s 额外暴漏无用的 NodePort 端口
nodeport_port: 0
|
三、系统使用
在DNS中写入该ip和域名对应的值之后,然后在浏览器中打开
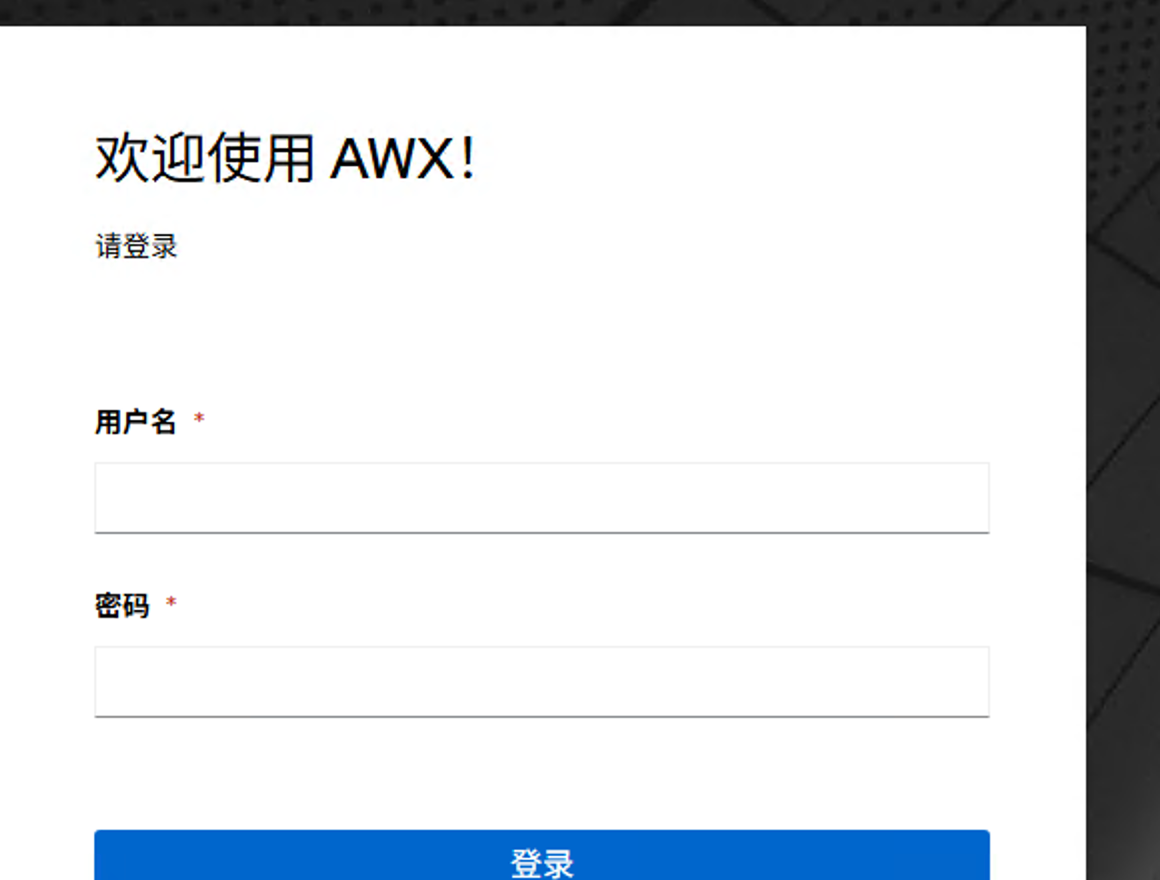 在192.168.2.101中使用如下命令获取admin的初始密码
1
2
3
| kubectl get secret awx-admin-password -n awx -o jsonpath="{.data.password}" | base64 --decode ; echo
#如果要修改密码
kubectl exec -it deployment/awx-task -n awx -c awx-task -- awx-manage update_password --username=admin --password=Admin@2026
|